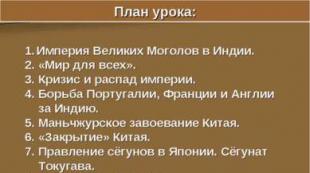
Drawings by students on the theme of autumn. Drawing on the topic: Autumn in kindergarten. Senior group. middle group, step by step
The golden time of nature, replacing the hot, sunny summer, brings with it not only the beginning school year, but the opening of the season of numerous holidays and special events for children and youth. They are carried out on a large scale both in schools and kindergartens. The program necessarily includes poetry and song performances and thematic exhibitions, at which children exhibit original handicrafts and drawings on the theme of autumn, drawn with pencil and paints. If your child has already been assigned to prepare something similar, then our interesting ideas will help you decide on the plot of your future work. We offer options for autumn drawings for children preschool age, students in grades 1-3 and 5-6. Choose a master class in your age category and, together with the younger generation, create small masterpieces with your own hands.
Drawing on the theme Autumn in pencil step by step with photos - master class
Autumn is a wonderful time of year, inspiring the creative impulses of writers, poets, photographers and artists. Creative people, sparing no epithets and colors, enthusiastically sing of the golden shades of falling leaves, the gray-blue depth of the sky, the light transparency of the cooling air, the thick clouds hiding the sun and the monotonous patter of the November rain. However, not only delicate watercolors, bright gouache and richly hued oil paints have the ability to convey all the charm of delicate autumn moods. The most prosaic simple pencil copes with this no worse. With its help, you can quickly and without much hassle create a very colorful and atmospheric drawing, reproducing on paper with almost perfect accuracy a fragment of an ordinary autumn day in a quiet corner of a large city park. A lonely bench, an umbrella forgotten by someone in a hurry, puddles and fallen maple leaves lying forlornly on the asphalt... A typical, but very touching landscape that evokes slight sadness... Do you think that only a person with the talent of a painter can draw it on whatman paper? Not at all. Even a schoolchild can cope with the task if he strictly follows the tips and recommendations of the master class below.
Necessary materials for a step-by-step pencil drawing on the theme of autumn
- simple pencil HB – 1 pc.
- simple pencil 2B – 1 pc.
- eraser – 1 piece
- A4 sheet of whatman paper – 1 piece
- ruler
- compass
- protractor
Instructions for drawing with a pencil on the theme of autumn for schoolchildren step by step

Drawing with paints on the theme of autumn for kindergarten - “October motives” - step-by-step master class
The program of traditional autumn holidays, held at the beginning of the new school year in many preschool children's institutions, almost always includes exhibitions and shows of thematic children's creativity. On them, kids demonstrate various crafts and drawings on the theme of autumn. Preparing for such events usually causes a lot of trouble for parents. After all, most boys and girls of preschool age are not yet able to draw smooth, clear lines, correctly mix watercolor shades and masterfully handle colored pencils or felt-tip pens. The drawings of preschool children more often resemble “scribbles” and rarely resemble a beautiful image that is pleasing to the eye. Moms and dads have to put a lot of effort into helping their child create an exhibit worthy of an exhibition. We invite you to learn a very interesting master class on painting, but not with a brush, but with foam swabs. Even the most Small child, and the result will look very bright, unusual and original.
Necessary materials for drawing on the theme of autumn for kindergarten
- Whatman sheet
- set of gouache paints
- pencils – 6 pcs.
- rubber bands for money – 10 pcs.
- foam squares 10X10 cm format – 10 pcs.
- wide brushes – 2-3 pcs.
Step-by-step instructions on how to make a drawing on the theme of autumn “October motives” for kindergarten
- Each pencil is wrapped at one end with a piece of foam rubber and secured tightly with a money elastic band. These are drawing tools.
- The work starts from the sky. Mix blue and white paints on a palette and paint the top of the sheet with a wide brush. Then a pencil with a foam edge is dipped in white paint and in a circular motion make clouds in the sky.
- The lower part of the sheet is tinted with dark green paint, and yellow and orange strokes are chaotically placed on top. This is earth strewn with leaves.
- When the general background of the picture has dried, tree trunks are outlined in brown.
- Using foam rubber, they are “dressed” in bright yellow and crimson foliage. When the paints are dry, the work will be suitable for display at a children's art exhibition.
Step-by-step drawing on the theme of autumn for children in grades 1-3 - video master class
This short video tells in an accessible way how to draw a picture on the theme of autumn with children in grades 1-3. The author advises to approach the issue creatively and allow children to create bright pictures not only with a brush, but also with their fingers. The kids really like it, and they are happy to dip their hands in paints to create their unusual painting masterpieces.
Drawing step by step on the theme of autumn for school with paints for grades 5-6 - master class with photos
For thematic school exhibitions, students in grades 5-6 can prepare a drawing on the theme “Golden Autumn” with paints. It will no longer be difficult for children at this age to make a quick sketch of the plot on paper with a pencil, and then paint the picture with delicate watercolors or rich gouache. Children in kindergarten will not be able to cope with such work yet, but children in grades 1-3 will definitely need the help of teachers or parents.
Necessary materials for autumn-themed painting
- paper
- paints
- brushes
- simple pencil
- maple leaves
Step-by-step instructions for students in grades 5-6 for painting with paints on the theme “Golden Autumn”
- A preliminary sketch of the drawing is made on a sheet of paper using a simple pencil.
- Paint the picture with the desired colors and let it dry completely.
- Along the perimeter of the picture, every 5-7 centimeters, place small drops of Moment glue and apply freshly picked maple leaves to them. Gently press them onto the paper and wait for the glue to set. To speed up this process, an improvised weight of several books is placed on the leaves. In a couple of hours, the painting with paints on the theme “Golden Autumn” in a frame made of living maple leaves will be ready.
Did this master class help you make a drawing on the theme "Autumn"?
Summary: DIY autumn crafts for children. Autumn drawings. How to draw autumn. Autumn leaves. Drawings of autumn trees. Paintings on the theme of autumn.
We have divided the article into two parts. In the first part we will teach you how to draw autumn trees in different ways. In the second part of the article we will tell you how to draw autumn leaves.
1. Autumn drawings. Drawing autumn trees
The easiest way to draw a tree is by blowing it from a straw. To do this, draw a trunk and several branches with black or brown paint, trying to leave as much paint on the paper as possible. And now the fun begins! Take a straw and blow the twigs through it. You will get a beautiful tree that looks very natural!

To make it autumn you can:
Draw a tree on a pre-prepared colored background made in autumn tones

Draw autumn leaves with a cotton swab or fingers


Use a hole punch to make confetti and pour it onto the areas of the design that previously need to be coated with glue.


Make an applique from dry leaves

Using a regular flower sprayer, spray paint mixed with a small amount of water. If you don’t have a spray bottle, an old toothbrush or hard brush can replace it.


2. Draw autumn. Drawings on the theme of autumn
You can also try to draw trees that are not of the usual shape, but some unusual, intricate, fabulous ones. For example, these.

This way you can draw a whole autumn forest

3. Autumn forest. Drawing an autumn forest
Many people are probably familiar with the technique of creating leaf prints on paper. To print a sheet, you can use absolutely any paint, you will just get slightly different prints. Paint should be applied to the side with veins. You can paint the sheet either with one color or with different colors.

By printing leaves on paper, you can make postcards or something else interesting. But if you print a large sheet, it will turn out to be a real tree!

Using the same principle, you can make an entire autumn forest.

4. Autumn applique. Application on the theme of autumn
Well, those who don’t like to draw can make an applique of autumn leaves “Autumn Forest”.
Autumn is one of the most enchanting times of the year. It was the golden autumn that inspired many poets and artists to write their most beautiful works. Therefore, in order to understand how to draw a golden autumn, it is recommended to familiarize yourself with the paintings of great painters. You can also take a walk in the park or just look at the beautiful autumn landscapes in high-quality photographs.
Before you draw golden autumn with a pencil step by step, you need to prepare the following stationery:
1). Pencil;
2). Liner (or black pen);
3). A piece of paper;
4). Eraser;
5). Multi-colored pencils in a set.
Now that all those things that are listed a little above are already nearby, you can begin to study the question of how to draw a golden autumn step by step:
1. On a sheet of paper, mark the location of the main objects - fir tree, oak tree, birch tree and fields in the distance;

2. Draw the oak tree, depicting its massive branches and hollow;

3. Draw a birch tree next to the oak tree. Mark the grass under the trees and draw a mushroom near the birch tree;

4. Draw fir branches and leaves lying on them. Draw the fields and the outlines of the forest in the distance. Draw grass, mushrooms and leaves falling on the ground;

5. Draw a field in the distance. In the sky, depict cranes flying away to warmer climes;

6. Now you understand how to draw a golden autumn with a pencil. Of course, the autumn landscape must be done in color, so don’t stop at this stage. Carefully outline the image with a liner;

7. Using an eraser, carefully clear the paper of pencil lines;

8. Use a black pencil to paint over the hollow of the oak tree. Use brown pencils to shade the trunk of the oak tree, as well as its branches;

9. Use yellow shades, as well as orange and swamp green, to paint over the oak foliage;

10. Paint the fir branches with green tones. Use yellow and orange pencils to color the leaves lying on the branches of the spruce tree, as well as on the grass and mushroom caps;

11. Shade the birch tree trunk a little with a gray pencil. Draw stripes on it with a black pencil. Color the birch foliage with yellow and orange pencils;

12. Color the mushroom legs with a black pencil, and their caps with red and burgundy pencils. Color the grass and forest in the distance with green pencils, as well as shades of yellow and brown;

13. Use brown and black pencils to color the field in the distance. Shade the cranes with gray and the sky with blue.

The drawing of the autumn landscape is ready! Now you know how to draw golden autumn.

Our video tutorial "How to draw a golden autumn"! Enjoy watching and see you at the next drawing lesson!
Reading time: 3 minutes
Almost all children, without exception, love to draw, but many parents, because of their own laziness and excuses like “he’ll get dirty himself and smear everything around him,” “I don’t know how to draw to show an example of how to do it,” “he’s too small, he’ll still get full.” these colors” they don’t give brushes and paints to kids, which is a pity... We hope that our marathon of children’s drawings on an autumn theme will inspire creativity for everyone without exception. There are plenty to choose from, dear Creators!
We tried to collect for you the most interesting drawing ideas in order to organize your child’s leisure time more interestingly when it’s time for rain, “dull charm” and sitting at home. Read on for ideas on what you can do at home with your child in bad weather.
Idea #1

You need to put the dried leaves between sheets of paper, and then paint over the sheet with solid strokes using soft colored pencils or crayons. A sheet with all the veins will appear on the white paper. Using this method, you can create compositions: a bouquet in a vase, an autumn landscape, etc.
Idea No. 2

A similar method, only you need to rub the leaves with wax (a candle or white wax crayon), and then cover a sheet of paper with watercolors. It is convenient to paint large surfaces with a wide squirrel brush or a foam sponge.
Idea No. 3

Paint is applied to the sheet from the vein side. Then the sheet is applied to the paper and an imprint is made. The effect will be different depending on what paint you use.

You can come up with many compositional solutions: the imprint of a large leaf can become the crown of a tree if you complete the trunk; A few prints are already a whole forest!

Prints made with white paint on a colored background look impressive. You can combine several techniques and complete the images with pencils or felt-tip pens.

Idea No. 4
 kokokokids.ru
By blowing paint through a straw you can paint fancy trees. This method gives you endless possibilities for experimentation! You can, for example, draw trees using a previously prepared background.
Idea No. 5

Fill your child with the background yourself or offer him some colored cardboard. Let him draw the crown of a tree and fallen leaves, dipping his finger in the paint.
Idea #6

The crown looks voluminous if you make it clear of colored pencils. Apply glue precisely to the desired places and sprinkle with small shavings. The trunk and branches can be blown through a tube or drawn in any other way.
Idea No. 7


It is convenient (and completely non-marking) to draw the crown with a cotton swab. In the same way, you can depict a bunch of rowan berries, a sprig of currants or other berries.
Idea #8

A very unusual picture can be made using foil. Place the dried leaf (or several) on a sheet of cardboard, veins up. Cover it with thin foil and carefully, so as not to tear it, smooth it with your fingers so that the design appears. Cover the foil with dark paint (you can use gouache, acrylic, tempera, ink) and let it dry well. Rub the painting very gently with a stiff dishwashing sponge. The protruding veins of the leaf will shine, and dark paint will remain in the recesses. Now you can frame your work!
Idea No. 9


Those who love textures will surely enjoy filling different silhouettes with patterns. Draw or trace an autumn leaf according to the template, divide it into small planes, like a stained glass window. Have your child fill in each piece with a different pattern. You can do this with a gel pen or felt-tip pens.

Idea #10
A similar task can be performed using the scratching technique. Paint a sheet of smooth (polished) cardboard with paints and rub it with wax (candle). You can use wax crayons to create a background. Cover the surface with black ink and dry. Scratch the drawing with a sharp object.
Idea No. 11
Using a stiff bristle brush or toothbrush, splatter paint. This method is suitable for drawing tree crowns and creating compositions based on plant imprints.
Unconventional drawing. Autumn
Master class on drawing. Autumn landscape
Kokorina Elena Yurievna, teacher visual arts, municipal educational institution Slavninskaya average comprehensive school, Tver region, Torzhok district.
Purpose of work: master class on drawing in non-traditional drawing techniques is intended for children from 5 years old, educators, teachers primary classes and fine arts, teachers additional education. The drawing can be used to decorate the interior or as a gift.
Target: creating a drawing on the theme “Autumn” using an unconventional method of drawing: using a cotton swab.
Tasks:
1) open up space for children's imagination;
2) create a drawing using gouache, cotton swabs, and a painting brush with stiff bristles;
3) development of creative thinking, interest in independent activities, fantasy and imagination.
Materials: gouache, painting brush (bristles No. 5 - No. 8), sippy cup water, a sheet of tinted cardboard, cotton swabs, black wax pencil.

Children, getting acquainted with the world around them, try to reflect it in their activities - games, drawing, modeling, stories, etc. Visual activity, in this regard, presents very rich possibilities. In order not to limit the children’s ability to express impressions of the world around them, a traditional set of visual means and materials is not enough. The more diverse the conditions in which visual activity takes place, the content, forms, methods and techniques of working with children, as well as the materials with which they work, the more intensely children’s artistic abilities will develop.
Non-traditional drawing techniques are an impetus for the development of imagination, creativity, the manifestation of independence, initiative, and expression of individuality. Applying and combining different ways images in one drawing, children learn to think, to independently decide which technique to use in order to make this or that image expressive.

Blue sky, bright flowers,
Golden autumn of wonderful beauty.
How much sun, light, gentle warmth,
Autumn gave us this Indian summer.
We are glad to see the last warm, clear days,
Honey mushrooms on stumps, cranes in the sky.
As if an artist with a bold hand
I painted the birch trees with gold paint,
And, adding red, he painted the bushes
Maples and aspens of wondrous beauty.
It turned out to be autumn—you can’t take your eyes off it!
Who else can draw like that? (Irina Butrimova)
Let's draw Autumn today. For work, we will take tinted blue cardboard - this way we will not have to set the color of the sky.
To begin, we will take a wide brush with coarse bristles and ocher gouache and paint the autumn grass: making broad strokes from the bottom up.


Let's take a cotton swab, white gouache and draw tree trunks. We draw the lines from bottom to top, placing them at different levels in height and width.

Guess what kind of tree we got: “Slim figure, white sundress” (Birch)
With another stick and yellow gouache, let's start drawing leaves on the birch trees. (For each paint, I suggest taking a new cotton swab, since cotton wool in water begins to spread and beautiful prints cannot be obtained.)


Now we use green gouache, but there will be few such dots, just to highlight the crown.


Add brown spots.


White-legged birches,
Tights with touches,
Curly, tall
Earrings with amber.
They sparkle like coins
polished leaves,
And they wave their branches,
Like girls with handkerchiefs. (F. Sokolova)
Let's draw the birch trunk and add black strokes. You can use black gouache. But this is a little difficult for preschoolers, so I suggest using a black wax pencil or black oil pastel. They easily leave a mark on white paint and do not bleed. To do this, draw along the contour of the white line and add small spots and branch lines. At the bottom we paint the trunk more densely.

For older children, you can use a black gel pen to draw the trunk. The outline will be brighter and more expressive.


Let's draw the grass using brown gouache.


Let's add foliage at the bottom of the birch crowns with yellow paint. We use the “poke” method.


Let's draw the second plan. To do this, take ocher and use the same “poke” method to fill the distance between the foliage of the trees and the grass with small spots.


Shade using black gouache.

Now let's add bright yellow spots.


The work is ready, you can insert it into a frame.

The autumn forest is again in golden decoration,
And the outfit was replaced by a sweet birch tree,
All its leaves were covered with gold,
On the top of the head towards the sky in a blue scarf.
You, white birch, are pretty,
And in winter and summer, in early spring,
A playful breeze braids your hair,
Gentle and cool, even playful.
Autumn does not spare either silver or gold,
Like an artist, autumn is rich in colors,
The autumn forest is again in golden decoration,
And the outfit was replaced by a cute birch tree.(L. Bondarenko)